When a domain expires, domain owners are given 40-day grace period to renew their domains. However, if the domain is not renewed, it will then enter the Redemption Period. This period will last for 30 days. During the Redemption Period, the domain owners can still renew the domain, but they are required to pay the $100 Redemption Renewal Fee plus the original domain renewal fee. If the Redemption Period is over and the domain is still not renewed, the domain will be listed as "Pending Delete" and it will later be released for general public registration
However, some people might find the $100 Redemption Fee is very expensive. Hence, it is very common that the domain owners decide to wait until the domain is released for general public registration. This approach is in fact very risky due to the following reasons
The Possibility of Losing Your Domain
All domains are registered on a first come first serve basis. Therefore, there is no guarantee that you can re-register your domain name after it is released for public registration. Also, a lot of internet firms often trace those easy-to-memorize domain names for re-sale purposes. Therefore, it is not easy to re-register an already-expired domain name after it is released for public registration.
Page Rank Issue
All domain names have a value of PageRank(PR). Newly signed up domain names have a zero value of PR. Assuming the PR for your domain is originally at 4. Once your domain is expired and has been released for public registration, your domain will now have a PR of 0 and you would need to put a lot of effort to re-gain the previous ranking.
Currently rated 1.5 by 2 people
- Currently 1.5/5 Stars.
- 1
- 2
- 3
- 4
- 5
There are many web hosting options available nowadays: free web hosting, shared hosting, dedicated server, and the list goes on. All these options serve the same purpose, which is hosting your content so that it can be accessed and viewed by people on the Internet. The major difference is how each is structured as well as the benefits they offer.
Let's have a closer look at each of them.

Free Web Hosting
What can be better than a free web hosting plan? This is a great option for someone who wants to create a homepage or small website to share with friends and family. While free web hosting has received criticism for its lack of features, security and customer support, there are a few reliable free web hosting providers that you can trust. However, keep in mind that free web hosting is more geared for giving you a taste of having and maintaining a small, personal website. If you want to establish a powerful web presence with an online business, you will need to consider a paid hosting service that offers more control, security and reliability. In other words, we do not recommend free web hosting to those who maintains a business, e-commerce related site. Apart from this, usually a free host provider will usually add banners, advertisements automatically on your site and this can make your site looks unprofessional.
Shared Hosting
As the name implies, shared hosting is an environment where you are sharing space on a web server with other users. As clients are sharing the cost of the server, this is the most affordable and popular solution for personal users and small businesses as companies to set up blog, e-commerce and other advanced applications. However, when hosting on a shared server, you are exposed to all the activities of your neighbors. If someone makes a huge scripting error, the entire server can suffer. If someone experiences a sudden burst in traffic, your site might run slower. If the server goes down, so does your website and ultimately, your business.
When selecting a shared hosting provider, you need to ask several important questions. Some questions are whether the server is overloaded, how many clients in a server, and what sort of server specifications that the server is running. You may also ask whether your site is on an exclusive application pool and if it is, it will certainly reduce the possible downtime on your site (which is caused by the other site on the server). One of the excellent shared hosting providers is ASPHostCentral.com. We do not and never ever overload our server. All the sites on our server are assigned its own application pool. We always monitor our server performance and all the sites activities on our server and this is to ensure that all the sites on the server are not causing issues to the entire server.
Dedicated Hosting
When your business takes off and requires more than the typical sharing server resources, it's time to move up to the dedicated server. Now you're in the big leagues with an entire server dedicated to your hosting needs. However, without any experience, succeeding with this hosting option is nearly impossible - those who require a dedicated server but don't know a thing about server administration can get by with managed hosting. In this scenario, the hosting service provider handles all the management tasks which frees you up to focus on other areas of the business. Keep in mind that a managed service requires is generally more costly.
What is the Best Hosting For You?
The best advice we can give about hosting is to know what you're getting into. Free services are geared for personal sites, shared hosting is suited for small businesses and a dedicated server is designed for larger hosting needs, yet is far more expensive. By knowing what your site requires, it will be much easier to determine which is the best solution
Currently rated 1.5 by 10 people
- Currently 1.5/5 Stars.
- 1
- 2
- 3
- 4
- 5
The simplified DotNetNuke 6 user interface dramatically increases productivity by making it much easier to build and maintain Web sites. New pop-up dialogs, a new control panel, updated administration modules and mega-menus combine to deliver a highly modern platform for building and operating websites. The following features are excerpt from http://www.dotnetnuke.com/Resources/Blogs/EntryId/3137/Announcing-DotNetNuke-6.aspx
A New Look
DotNetNuke 6 delivers a fresh new look out of the box with a great looking contemporary skin and a default site template that helps new users get started quickly. Using modern mega-menus and some lightweight containers, DotNetNuke 6 provides the perfect canvas on which to build your next web masterpiece.
Fully Integrated
For the first time ever, the DotNetNuke Store (Snowcovered.com) and the Extensions Forge, with over 10,000 application extensions, are directly accessible from within the core DotNetNuke platform. The tight integration simplifies the process of finding, purchasing and installing DotNetNuke apps
DotNetNuke in the Cloud
DotNetNuke 6 delivers a platform that is fully compatible with Windows Azure Hosting and provides cloud service integration with the addition of the new Windows Azure Storage and Amazon S3 folder providers. DotNetNuke 6 provides a great foundation for moving to the cloud, whether you need to your whole site to live in the cloud or just your content.
DotNetNuke Commerce
DotNetNuke 6 Professional and Enterprise includes a great new eCommerce module that empowers organizations to quickly add eCommerce capabililities to their website. The new eCommerce module is designed for organizations seeking to deliver a small portfolio of digital goods and services to their end users and is built from the ground up with simplicity and customer experience in mind.
SharePoint Meets DotNetNuke
Available exclusively in the DotNetNuke Enterprise Edition, the Microsoft SharePoint Connector for DotNetNuke enables fast, secure publishing of documents stored in Sharepoint to public web sites, extranets or intranets. Organizations can securely manage their document library within SharePoint and selectively publish those documents using the flexible, cost effective DotNetNuke platform.
DotNetNuke Learns a New Language
DotNetNuke 6 has gotten a major new platform upgrade as the result of a complete conversion to C#. This language change will make it more accessible to a larger development community and allows us to leverage many development tools which have always had strong C# support. The C# version of DotNetNuke has been available for the past year and starting with DotNetNuke 6, it is officially the primary development language of the platform.
Where to go for DotNetNuke 6 Hosting?
ASPHostCentral.com offers the latest DotNetNuke 6 application to all our new and existing customers. This application is readily available via our control panel and you can install it within 1 (ONE) minute. It just requires several click on your mouse and moreover, it is provided FREE of charge!
You can always start with our Standard Plan (from @$4.49/month) to get this application installed on your website. Should your requirement changes in the future, you can always request for an upgrade without causing any downtime. Remember, everything is just one-click away from your mouse! So, why wait longer? Please register your interest here.
Currently rated 1.5 by 25 people
- Currently 1.500001/5 Stars.
- 1
- 2
- 3
- 4
- 5
You can provision managed metadata column into the content type.
You need to add the “Metadata” column into the site columns and content type using element xml file, and also need to connect the field to metadata column in the feature activation.
Here is the solution:
1. You need to add a new field element of the type “TaxonomyFieldType”.
<xml version="1.0" encoding="utf-8" ?>
<Elements xmlns="http://schemas.microsoft.com/sharepoint/">
<Field ID="{46138ADB-1778-4E05-8371-114006F725A0}"
Type="TaxonomyFieldType"
DisplayName="Locations"
ShowField="Term1033"
Required="TRUE"
EnforceUniqueValues="FALSE"
Group="_Custom"
StaticName="Locations"
Name="Locations"
/>
</Elements>
2. Add this filed to the content type, just need to add a new “FieldRef”
<FieldRef ID="{46138ADB-1778-4E05-8371-114006F725A0}" Name="Locations"/>
3. Now we have to connect this field to managed metadata service(MMS).
For this we need to create an event receiver for the feature. Right click on the feature and select “Add event receiver”.
Uncomment the “feature activate” code and replace it with the following code.
public override void FeatureActivated(SPFeatureReceiverProperties properties)
{
SPSite site = properties.Feature.Parent as SPSite;
Guid fieldId = new Guid(“{46138ADB-1778-4E05-8371-114006F725A0}"
if (site.RootWeb.Fields.Contains(fieldId))
{
TaxonomySession session = new TaxonomySession(site);
if (session.TermStores.Count != 0)
{
var termStore = session.TermStores["Managed Metadata Service"];
var group = termStore.Groups.GetByName("Locations Group");
var termSet = group.TermSets["Towns"];
TaxonomyField field = site.RootWeb.Fields[fieldId] as TaxonomyField;
field.SspId = termSet.TermStore.Id;
field.TermSetId = termSet.Id;
field.TargetTemplate = string.Empty;
field.AnchorId = Guid.Empty;
field.Update();
}
}
}
This method will check if the field has been deployed. We used Guid to retrieve the filed as defined in the XML. Your term store group definition should look like this. 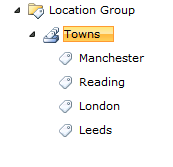
If it is different then you need to change the “group name” and “term set” name in the feature activation according to your MMS environment.
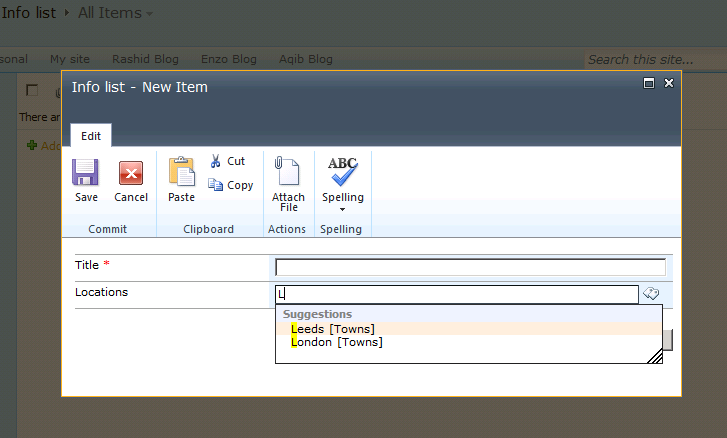
Now you deploy your content type and can test it by creating a new list from that content type.
The result with the metadata column is shown in the below picture.
Currently rated 1.6 by 69 people
- Currently 1.550725/5 Stars.
- 1
- 2
- 3
- 4
- 5
Apply a Theme to all sub sites:(works for MOSS 2007 only, not WSS 3.0)
- Change the top site to the theme of your choice using the normal method in Site Actions > Site Settings > Site Theme.
- Navigate to the top site to see the newly applied theme.
- View the HTML source of the SharePoint page using the theme you want.
- Look for a link tag containing the .css file for the applied theme. It will look something like this:
<link rel="stylesheet" type="text/css" id="onetidThemeCSS" href="/apps/afe/_themes/Belltown/Bell1011-65001.css?rev=12%2E0%2E0%2E4518"/>
- Copy the href value to your clipboard or to a text file if you like. It should look something like:
/apps/afe/_themes/Belltown/Bell1011-65001.css
- On your top level site, go to the Site Actions > Site Settings > Master Page screen.
- Scroll to the bottom where the Alternate CSS URL section is. Select the "Specify a CSS file..." option.
- Paste the path copied from the href above into the text box.
- Check the Reset all sub-sites to inherit this alternate CSS URL option.
- Click OK.
- Navigate to your sub-sites and verify the theme has been applied.
Currently rated 1.5 by 2 people
- Currently 1.5/5 Stars.
- 1
- 2
- 3
- 4
- 5
Be the first to rate this post
- Currently 0/5 Stars.
- 1
- 2
- 3
- 4
- 5
Master Page
A crowd favorite, master pages have emerged as the new "it" thing in SharePoint design. Master pages are a feature of ASP.NET 2.0 and allow you to store common page elements, such as a header, content container, and footer, in a single file. This file is then applied to every content page in your site creating a unified and branded look across the entire site.
The benefits to master pages:
- If your design really deviates from the standard SharePoint look and feel, master pages are for you. They allow for the most finite control over your page design
- Multiple master pages can be created for various site needs, such as home splash screens, sub page designs, regional or divisional designs, etc
- You can assign a master page to an entire site, or to a single page, and several options in between. You have excellent control of where the master page is applied within your site
The potential issues that you need to know about:
- Your custom master page will not reach past your standard web pages and affect the application screens (these are the administrative screens peppered throughout the site; you can pick them out by looking at the URL, they always include "_layouts" in the address). For some sites, especially external facing brochureware sites, this isn't a big deal. For others, especially internal sites and Intranets, this can present an issue
- Creating and editing master pages does require a certain web skill set. You need to know HTML, CSS and be comfortable with ASP.NET and understand what a content placeholder is and how to use them
- CSS only based master page designs are a challenge to create! Short of pitching everything provided to you by the application, you will have tables in your design no matter what, and working around those tables and needs for SharePoint will cause you CSS headaches
How to create a master page
A great way to create master pages is to use SharePoint Designer. Yes you can use other tools, but SharePoint Designer helps create that bridge between you and your SharePoint site and just makes working with the site a heck of a lot easier. Through either SharePoint Designer or the SharePoint site interface you can add and manage master pages in the Master Page Gallery and apply master pages to your site and site pages. To create the file in SharePoint Designer you just do a File / New / SharePoint Content / Master Page. If you don't use SharePoint Designer, you can use the web interface to upload a master page to the Master Page Gallery much like you would upload a document to a SharePoint document library
When you first deploy your base master page, it can be rather alarming since there is no design or layout! That is ok, this is a great way to start your design. Add in your design code to the top of the file, and then locate the content placeholders you need in your design. Move the content placeholder code to the appropriate place in your design code, then hide all of the ones you did not use at the bottom of the file where indicated. It is a puzzle approach and you essentially fit together your code and the SharePoint content placeholders to create your custom master page
Another approach is to start off with a master page that SharePoint provides (for WSS sites it is only default.master, publishing sites include several other master pages) and then modify the code from there. We personally don't like this approach because we think it takes more time to create custom master pages this way, and it limits your creativity. When you look at an existing design and try to morph it into your own, you may very well end up with a site design that looks similar to the original
Using the master page you created
Once the master page has been created, you can do several things with it. Using SharePoint Designer you can set the master page to be used for the site, or you can attach it to a single page. If you have a MOSS site, you can also use the site settings to specify the master page to be used for the site. Make sure you publish your MOSS master page before you use it for testing or production
Themes
Themes are very useful and provide a more lightweight way to brand your SharePoint site. A theme can change the existing colors and images of a site, but not the layout of the elements in the site design. A theme does not include any HTML or ASP.NET code, it is only a collection of image files and CSS files. The theme is applied on top of the site, replacing images and CSS styles in the site, essentially re-skinning the site. Themes can be used alone, or in conjunction with a custom master page
The benefits to themes
- Often a theme can handle your design changes for SharePoint. The web page layout for SharePoint uses the standard formula of header, main navigation across the top and a left navigation area. If your design includes the same layout, you may be able to create your design only with a theme
- Themes can be used to alter a design to create different variations of a design for departments, divisions or regional sub sites
- Themes affect all aspects of a site, including the application screens
The potential issues that you need to know about
- When you apply a theme to a site, any child sites will not inherit the theme application. You have to individually apply the theme to the child sites. This is an out-of-the-box limitation, and like most SharePoint issues, can be worked around programmatically. If this will create an issue, check out some of the solutions available for forcing theme application via Features and other means
- When you make a change to a theme, you have to reapply the theme to the site to see the change
- When working with a theme, you can only utilize existing CSS styles used in the master page (be it your own or the default SharePoint ones). If there are elements on the page that need to be moved, you will have to use positioning in the CSS styles to shift their layout. You can't add CSS IDs or class names, so you are limited to what you can do with what is given to you in the master page code.
How to create a theme
Themes are applied to a site in the Site Settings. When a Theme is applied, a copy of the theme is created in the content database and it pops up in SharePoint Designer. This makes for a great way to develop a Theme. When you make a change to any of the files in SharePoint Designer, it will automatically appear in the site. Because of this, SharePoint Designer is a great platform for custom theme development, but we don't suggest leaving these changes in the content database post development. When another theme is applied to the site, the previous theme is wiped out (including your changes) and the new theme is put in its place
So you can create a custom theme in one of two ways. First, just strike out on your own. You can apply a theme to a site, then open up the CSS file in SharePoint Designer and delete out all of the contents and start writing your own style overrides for the site. Add images in the same way. Or, you can pick a theme that looks similar to your design (if one exists) then make modifications to that theme in SharePoint Designer until the theme looks like your design
Don't forget about the power of CSS. There isn't necessarily a one to one relationship with elements on the page. If there is a CSS class or ID attached to a page element, you can dictate many things about that element just using CSS, such as display, placement and look. Through CSS, you can actually create a lot of modifications to the page
Using the theme you created
After you are done tweaking your theme, you can create a more permanent version that lives on the web server and is available to all sites. How to create a theme is very well documented. On the web server in the 12 directory, you create a copy of an existing theme, modify the INF file, theme directory name, and the SPTHEMES.XML file. Then you can strip out the theme contents, and insert in the CSS and images you created in SharePoint Designer. Recycle the application pool for the SharePoint site or reset IIS, and your custom theme is now available for use
CSS
Really no matter how you brand your SharePoint site, you will be dealing with CSS. In addition to master pages and themes, you can choose to only do CSS and not use master pages or themes as a vehicle for implementation. You can just make CSS changes and tell the SharePoint site to reference the new CSS file
The benefit to CSS only solutions
- The CSS file does not have to live on the SharePoint web server. You can point the CSS reference to anywhere else on the web. This is ideal if you don't have access to your web server
The potential issue that you need to know about
- WSS only sites don't have a site setting to specify an alternative CSS file. You will have to change something else in the site in order to pull in the CSS file. You can modify default.master, or a specific content page like default.aspx, or include it at the page level in a Content Editor Web Part. A more elegant way to handle this issue is to use a theme. If you don't have access to the web server, you can assign a theme to your WSS site, empty out the contents of the theme in SharePoint Designer, then point to or include your custom CSS. Just be sure to keep a back up copy
How to use your custom CSS
MOSS has a nice feature that allows you to specify an alternative CSS file in the Site Settings. If you have multiple files you want to include, just specify one file in the site settings, then use the import declaration in the CSS file to include additional CSS files. If you have a WSS only site, see the bullet point above for options
What about editing CORE.CSS?
Yes, ok you can do this, but we really don't recommend it. Here is why:
- You aren't supposed to edit the default SharePoint files - basic rule of thumb and changes can throw you into an "unsupported state". If you choose to do this anyways, create a back up of Core.css before you make any changes so at anytime you can overwrite your modified file and put yourself back into a supported state
- Core.css is HUGE. 15,000 lines of code kind of huge. We say don't edit this file because dealing with that large of a file is difficult and you will quickly get bogged down trying to keep up with your changes
- Core.css isn't the only CSS file that SharePoint uses. In all, there are 26 CSS files in SharePoint (depending on your installation). So really you aren't looking at making edits to only one CSS file, you will probably get into making tweaks for 1-5 files out of that 26. It really comes down to management of your changes and knowing what was modified where. Make it easy and just create a separate style sheet.
Be the first to rate this post
- Currently 0/5 Stars.
- 1
- 2
- 3
- 4
- 5
When you browse a Windows SharePoint Services 3.0 site collection, you cannot access the site collection as expected. Instead, you receive an HTTP 404 error message. Additionally, you experience the following symptoms:
- The following error message is logged in the Application log on the server that is running SharePoint Services 3.0:
Event Type: Error
Event Source: Windows SharePoint Services 3
Event Category: Topology
Event ID: 6800
Date: date
Time: time
User: N/A
Computer: computer_name
Description:
The database WSS_Content on computer_name\Microsoft##SSEE is not accessible to missing Windows Internal Database signatures.
- You receive an error message in the upgrade log that resembles the following:
[SPServerSequence] [DEBUG] [date time]: Web service Instance SPWebServiceInstance Parent=SPServer Name=computer_name not added. Status = Provisioning
Finally, you may also receive one of the following error messages:
Access to the table dbo.sites is blocked because the signature is not valid
Access to module dbo.proc_GetCurrent is blocked because the signature is not valid.
This problem occurs after a hotfix package or a public update for Windows SharePoint Services 3.0 is applied
Cause:
This problem occurs if the SPWebService service has not been fully provisioned.
Resolution:
To resolve this problem, follow these steps:
1. Click Start, click Run, type cmd in the Open box, and then click OK.
2. Change to the following directory:
system drive:\Program Files\Common Files\Microsoft Shared\Web Server Extensions\12\Bin
3. At the command prompt, type the following command, and then press ENTER to stop the SPWebService service:
stsadm -o provisionservice -action stop -servicetype spwebservice -servicename ""
4. After the SPWebService service has stopped, type the following command, and then press ENTER to start the SPWebService service:
stsadm -o provisionservice -action start -servicetype spwebservice -servicename ""
5. After the SPWebService service is started, type the following command to complete the hotfix process or the update process:
psconfig -cmd upgrade -inplace b2b -wait -force
Be the first to rate this post
- Currently 0/5 Stars.
- 1
- 2
- 3
- 4
- 5
The following describes few advantages of using Windows Sharepoint. ASPHostCentral.com, as a leading Windows Sharepoint and MOSS 2007 hosting provider, proudly presents this article to anyone and we believe it may benefit ASP.NET and Sharepoint community or anyone who are using Sharepoint/MOSS.
1 – Discovered the solutions straight to your business requirements
Small, medium or even world class organizations seeking a more customized deployment can get started quickly with application templates for addressing specific business processes or sets of tasks.
2 – Business security made easy to users
Windows SharePoint able to increase the security of information resources, while decreasing cost and complexity associated with site provisioning, site management, and support.
3 – Take file sharing to new level storage capabilities for all level of users in a company
Enable workspaces with document storage and retrieval features, including check-in/check-out functionality, version history, custom metadata, and customizable views.
4 – Improve team productivity – the main company priority
Connect people with the information and resources they need. Users can create team workspaces, coordinate calendars, organize documents, and receive important notifications and updates through communication.
5 – Feeling slow loading time with SharePoint interface? Not at all with SharePoint 3.0!
The intelligence of Windows SharePoint improvements in Windows SharePoint Services 3.0 includes enhanced views and menus that simplify navigation within and among SharePoint sites. Integration with familiar productivity tools, including programs in the Microsoft Office system
6 – Now you can manage your documents easier than you thought
Users have the ability to view revisions to documents and restore to previous versions, and the control to set document- and item-level security.
7 – many more
Where do you go for Sharepoint (WSS) Hosting?
What we think makes ASPHostCentral.com so compelling is how deeply integrated all the pieces are. We integrate and centralize everything--from the systems to the control panel software to the process of buying a domain name. For us, that means we can innovate literally everywhere. We've put the guys who develop the software and the administrators who watch over the server right next to the 24-hour Fanatical Support team, so we all learn from each other:
- 24/7-based Support - We never fall asleep and we run a service that is operating 24/7 a year. Even everyone is on holiday during Easter or Christmas/New Year, we are always behind our desk serving our customers
- Excellent Uptime Rate - Our key strength in delivering the service to you is to maintain our server uptime rate. We never ever happy to see your site goes down and we truly understand that it will hurt your online business. If your service is down, it will certainly become our pain and we will certainly look for the right pill to kill the pain ASAP
- High Performance and Reliable Server - We never ever overload our server with tons of clients. We always load balance our server to make sure we can deliver an excellent service, coupling with the high performance and reliable server
- Experts in Sharepoint Hosting - Given the scale of our environment, we have recruited and developed some of the best talent in the hosting technology that you are using. Our team is strong because of the experience and talents of the individuals who make up ASPHostCentral
- Daily Backup Service - We realize that your website is very important to your business and hence, we never ever forget to create a daily backup. Your database and website are backup every night into a permanent remote tape drive to ensure that they are always safe and secure. The backup is always ready and available anytime you need it
- Easy Site Administration - With our powerful control panel, you can always administer most of your site features easily without even needing to contact for our Support Team. Additionally, you can also install more than 100 FREE applications directly via our Control Panel in 1 minute!
Happy hosting!
Currently rated 1.4 by 19 people
- Currently 1.421052/5 Stars.
- 1
- 2
- 3
- 4
- 5
Excel Services is a new server technology included in MOSS 2007. There are three basic components to Excel Services that interact with each other and together form the overall structural design of Excel Services. These shared services enable you to load, calculate, and display Excel workbooks in a browser without writing any code. You can control which data is displayed and you can maintain a versioning of your Excel workbook. The following article will explain briefly about utilising Excel Service, an advanced MOSS 2007 feature. If you need MOSS 2007 Hosting, you can always contact ASPHostCentral.com as you can always starts from as low as $30.00/month for MOSS 2007 service.
Excel Web Access (EWA) is a Web Part that allows a user to open an Excel workbook in a browser and allows users to interact with the workbook in the browser with the familiarity of the Excel client. It displays and enables interaction with the Microsoft Office Excel workbook in a browser by using Dynamic Hierarchical Tag Markup Language (DHTML) and JavaScript without the need for downloading ActiveX controls or additional software on the client computer. This component can also be connected to other Web Parts on dashboards and other Web Part Pages to provide more advanced capability
Excel Web Services (EWS) is a service used to programmatically access Excel workbooks stored in MOSS 2007. It allows developers to send parameters, retrieve results, and refresh calculations from Excel workbooks stored on a server. This Web service is hosted in MOSS and provides an application programming interface (API) to build custom applications based on the Excel workbook
Excel Calculation Services (ECS) is the “engine” of Excel Services that allows a user to load an Excel workbook from a trusted file location, and execute calculations in Microsoft Office Excel 2007 while it refreshes external data, and maintains sessions. Excel Calculation Services also has the ability to impersonate user credentials when a user accesses a workbook. To configure this you need to set the Windows Authentication option on the Excel Services Advanced Settings page
Because Excel Services is a component of Microsoft Office SharePoint Server 2007, you can also take advantage of many SharePoint technology features such as controlling security, versioning, and audience targeting
Where do you go for MOSS 2007 Excel Service Hosting?
What we think makes ASPHostCentral.com so compelling is how deeply integrated all the pieces are. We integrate and centralize everything--from the systems to the control panel software to the process of buying a domain name. For us, that means we can innovate literally everywhere. We've put the guys who develop the software and the administrators who watch over the server right next to the 24-hour Fanatical Support team, so we all learn from each other:
- 24/7-based Support - We never fall asleep and we run a service that is operating 24/7 a year. Even everyone is on holiday during Easter or Christmas/New Year, we are always behind our desk serving our customers
- Excellent Uptime Rate - Our key strength in delivering the service to you is to maintain our server uptime rate. We never ever happy to see your site goes down and we truly understand that it will hurt your online business. If your service is down, it will certainly become our pain and we will certainly look for the right pill to kill the pain ASAP
- High Performance and Reliable Server - We never ever overload our server with tons of clients. We always load balance our server to make sure we can deliver an excellent service, coupling with the high performance and reliable server
- Experts in MOSS Hosting - Given the scale of our environment, we have recruited and developed some of the best talent in the hosting technology that you are using. Our team is strong because of the experience and talents of the individuals who make up ASPHostCentral
- Daily Backup Service - We realize that your website is very important to your business and hence, we never ever forget to create a daily backup. Your database and website are backup every night into a permanent remote tape drive to ensure that they are always safe and secure. The backup is always ready and available anytime you need it
- Easy Site Administration - With our powerful control panel, you can always administer most of your site features easily without even needing to contact for our Support Team. Additionally, you can also install more than 100 FREE applications directly via our Control Panel in 1 minute!
Happy hosting!
Currently rated 1.5 by 2 people
- Currently 1.5/5 Stars.
- 1
- 2
- 3
- 4
- 5