ASPHostCentral.com SharePoint 2013 Hosting BLOG

All about Sharepoint 2013 Hosting articles

Important SharePoint 2013 Download Links

clock January 8, 2013 19:22 by author Administrator

The final(RTM )release of SharePoint 2013 is now available on Microsoft Website for download.  The following are important things about SharePoint 2013:

SharePoint 2013 Hosting:

If you are looking for a host that supports SharePoint 2013, you can take a look at ASPHostCentral.com


Free Software:

Microsoft SharePoint Foundation 2013 (~ 816 MB) –
Download Link
Microsoft SharePoint Designer 2013 – 32bit (~ 282 MB) – Download Link
Microsoft SharePoint Designer 2013 – 64bit (~ 324 MB) – Download Link
Microsoft Office Web Apps Server 2013 (~ 386 MB) – Download Link
Office Developer Tools for Visual Studio 2012 (Non-RTM / Preview 2) | Installer Link | Announcement News on 12-Nov-2012

Trial/Evaluation Software:

Microsoft SharePoint Server 2013 (180 days Evaluation) –
via TechNet |Product Key: NQTMW-K63MQ-39G6H-B2CH9-FRDWJ
Microsoft SharePoint Server 2013 (by using Office 365 Developer trial, you need not setup environment) -
via MSDN

Licensed Software:

Microsoft SharePoint Server 2013 – (available to
MSDN Subscribers)

Pre-RTM Versions:


Microsoft SharePoint Server 2013 Preview (
Evaluation Version link / Product Key: 6RNT8-XV26M-GWH36-VMGQH-94MMH)

Microsoft SharePoint Foundation 2013 Preview (~ 947 MB) –
Download Link

Currently rated 2.6 by 454 people

  • Currently 2.621146/5 Stars.
  • 1
  • 2
  • 3
  • 4
  • 5


Microsoft Emphasizes Cloud-First with SharePoint 2013 Hosting

clock December 20, 2012 17:18 by author Administrator

As Microsoft showcased its new SharePoint 2013 and the SharePoint online upgrades to its Office 365 service this week, it raises the question of how far organizations are willing to go to phase out their premises-based software in favor of shifting everyday work to a service-based model.

That's not to suggest that organizations will or should scrap their SharePoint deployments in favor of Office 365 or some other instantiation of Microsoft's collaboration platform that's subscription-based or hosted elsewhere. It's not an either/or proposition. But Microsoft left little doubt it wants you to gravitate to the SharePoint Online component of its Office 365 service.

"We really recommend moving to the cloud for the best experience overall," said John Teper, the Microsoft corporate vice president known as the "father of SharePoint," speaking in his opening keynote at the annual SharePoint Conference in Las Vegas Monday. "We understand not everyone is there yet. This will take time. People who want to run their own servers, that's great. We have the best server release we've ever done in SharePoint 2013. The thing you should take away from our cloud focus is all we've learned about optimizing the system and deployment and monitoring, we've put into the server product and put into the deployment guidance."

SharePoint 2013's "Cloud-First" model follows in the footsteps of Microsoft's promise that it will deliver infrastructure software and applications as a cloud service first or simultaneously with the release of the on-premise version of its key products. That came to life with last year's CRM Online Dynamics CRM duo. Now Microsoft is employing the same approach with the latest version of SharePoint Online in the Office 365 service and SharePoint 2013.

One of many distinctive new cloud features in SharePoint 2013 and SharePoint Online is the new SkyDrive Pro, an evolution of the SharePoint Workspace. SkyDrive Pro raises the bar in synchronizing content between SharePoint Sites and workers' various devices. SkyDrive Pro is modeled after the consumer-based SkyDrive service, except it's built into SharePoint, which allows IT organizations to manage it.

Experts are predicting more rapid than usual uptake for the new release of SharePoint and Office 365, primarily due to the major overhaul of the SharePoint experience, which brings enterprise social networking to the forefront.

A Forrester Research poll of 153 clients who already have SharePoint found 68 percent of respondents planned to introduce the new version within two years (37 percent within the first year and 31 percent within the second). What's interesting about that finding is 70 percent of that sample said they already have upgraded to SharePoint 2010, which is unusual since organizations typically skip subsequent releases to amortize their investments.

"This is conjecture here but it could be around the social experience," said Forrester analyst Rob Koplowitz in an interview. "The feedback on the social facilities in SharePoint 2010 was pretty dismal. That might be the driver but others include the need for improved document and records management. Also, it could be they're trying to move to a more stable development environment."

Speaking of social networking, that's where Yammer comes in, the popular social networking company Microsoft just acquired for $1.2 billion. Microsoft announced it's bundling the popular cloud-based enterprise social networking service, into SharePoint 2013 and Office 365 in addition to offering it as a standalone offering and plans further integration.

In the annals of Microsoft's cloud transition, 2010 will be remembered as the year CEO Steve Ballmer proclaimed the company is "all-in." With the revamp of SharePoint and Office, we may get our biggest sense yet how many Microsoft's customers are all-in.

Currently rated 2.0 by 210 people

  • Currently 1.976189/5 Stars.
  • 1
  • 2
  • 3
  • 4
  • 5


SharePoint Foundation 2013 Hosting :: Setting up your App domain for SharePoint 2013

clock December 9, 2012 13:43 by author Administrator

The most important change in SharePoint 2013 for developers is the introduction of SharePoint apps. An app for SharePoint is a small and isolated application that provides a specific bit of functionality. SharePoint apps can and have to be added to or removed from a site by the site owner.  Apps have their own, isolated URLs, which are separate from the URLs of the sites where the app is being deployed to and where the app is being used. In order to provide isolation apps run in their own domain, instead of in the same domain name as your farm. Using a different domain name for apps helps prevent cross-site scripting between apps and SharePoint sites.

Each installation of an app has its own unique URL within the app domain. The app’s URL is based on a template “http://[app prefix][app hash].[app domain]/[relative site url]/[app name]. When you add an app to a site, a subweb of that site is created to host the app content. This subweb is not visible on the Site Contents page though.

Because apps run in their own app domain you will have to configure Domain Name Services (DNS) in your environment in order to be able to host apps. There is a page on TechNet that describes how to setup you DNS, but because it took me a while to get it all working I decided to write a step by step guide, which is what you’re reading now.

You can choose whether you want your app domain to be a subdomain of the domain that hosts the SharePoint environment (option B), or whether you want to create a completely new domain for your apps (option A). Creating a new domain specifically to host your apps in is a bit more secure, but it also requires a little bit more configuration. I will describe both approaches in this article. If you don’t have control over your DNS you will have to ask an administrator to perform these steps for you.

Option A: Create a new domain to host your apps in

- Go to “Start”
- Click on “Administrative Tools”
- Select “DNS”
- Right click “Forward Lookup Zones” and select “New Zone…”
- Click “Next”
- Keep the default and click “Next” again
- In most cases, especially if your development server is in it’s own domain you can use the default on the next tab again and can just click “Next”
- You now have to specify a zone name. It’s up to you what you choose here. My domain name is “solutions.com” and for my app domain I will use “solutionapps.com”
- Click “Next”
- Click “Next”
- Click “Finish”
- Right click on your new zone and select “New Alias (CNAME)…”
- Fill in a * for “Alias name (uses parent domain if left blank)”
- Click “Browse”
- Double click on your server name
- Double click “Forward Lookup Zones”
- Double click the domain of your SharePoint environment. In my case this is “solutions.com”.
- Select “(Same as parent folder)” and click “OK”
- Click “OK”.

* Note that selecting the FQDN of the domain in here will only work in single server scenarios. If you are using more than one server you should be pointing to the DNS record of the web server in here. This is either the DNS A record for the web server, or the DNS record of the primary cluster address for NLB environments.

You are now done setting up your DNS and it should look like this:

Option B: Create a subdomain to host your apps in

- Go to “Start”
- Click on “Administrative Tools”
- Select “DNS”
- Right click on the name of your domain and select “New Alias (CNAME)…”
- Fill in “*.app” for “Alias name (uses parent domain if left blank)”
- Click “Browse”
- Double click on your server name
- Double click “Forward Lookup Zones”
- Double click the domain of your SharePoint environment. In my case this is “solutions.com”
- Select “(Same as parent folder)” and click “OK”
- Click “OK”

* Note that selecting the FQDN of the domain in here will only work in single server scenarios. If you are using more than one server you should be pointing to the DNS record of the web server in here. This is either the DNS A record for the web server, or the DNS record of the primary cluster address for NLB environments.

You are now done setting up your DNS and it should look like this:

Configuring SharePoint

I’m assuming you already created an App Management and a Subscription Settings Service Application and that you already started the App Management and Subscription Settings services on your servers. If not this MSDN article will tell you how to. Note that you have to use PowerShell to create the Subscription Settings Service Application. There is no user interface for it.

- Go to Central Administration
- Click on “Apps” in the left side navigation
- Click “Configure App URLs”
- Fill in the URL of the app domain that you configured. If you choose to use Option A the url will be something like “solutionapps.com”, if you choose to use Option B it will look like app.solutions.com.
- Fill in an app prefix. This can be anything you like, although it is best to keep this short. I used “app” myself.

Beware of host headers

You are now ready to deploy your apps. Because of all this extra domain stuff though there are a few things you should know about your web applications and site collections.

If you are using a host header for your web application apps won’t just work for that web application. Because of how the redirect for the app domain works IIS will try to resolve the app url by using the default IIS web site, which of course doesn’t work. If you want to use host headers for your web applications you have to create an extra web application that is listening on port 80 (or 443 if you are using https) and that doesn’t have a host header.

This means that you have to create a web application like you normally would. You have to make sure that you select port 80 (or 443 if you are using https) and you should not fill in a host header. Note that you have to stop the Default Web Site in IIS in order to be able to do this. The web application will use the server name as its url. The web application can be empty except for a root site collection.

Another option is to use web applications without host headers and to create Host Header Site Collections. Be aware that Host Header Site Collections cannot be created via the user interface, they can only be created by using PowerShell.

Currently rated 2.9 by 179 people

  • Currently 2.938549/5 Stars.
  • 1
  • 2
  • 3
  • 4
  • 5


SharePoint Foundation 2013 Hosting - SharePoint 2013 workflows in Visio

clock November 12, 2012 17:12 by author Administrator

Visualizing processes is at the heart of Visio's DNA and in Visio 2010 we took a big step forward in that area by including support for SharePoint workflows. This lets users create a workflow in Visio, import it into SharePoint Designer, and make it an executable workflow on SharePoint.  In the new Visio we've added SharePoint 2013 workflows and made SharePoint Designer an even more integral part of creating workflows visually.


What are SharePoint workflows?

If you're not familiar with SharePoint workflows, they are process flows that use pre-defined common activities (such as send email) that can be executed as an automated process on a SharePoint server. This workflow could represent any of a number of business processes, such as a credit approval process, document review feedback, document approval, etc.  In Visio 2010 we added a template that would allow you to design a workflow visually, then export your workflow to SharePoint Designer, where you could add parameters to your workflow and publish it.

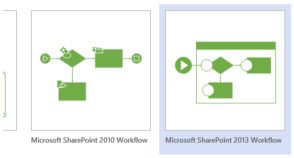
The new Visio still includes SharePoint 2010 workflows that you can use as you have in the past, but it adds the new Microsoft SharePoint 2013 Workflow template.

Some major changes

Once you create a new SharePoint 2013 workflow, instead of a blank canvas you'll see that every new workflow starts with an empty container called a "stage". Support for stages was a highly requested feature that allows you to simplify complex workflows. Each stage contains all of the actions that make up that logical section of the workflow. Simple workflows might be only a single stage, while complex workflows could have many stages. Within stages, "step" containers allow you to further organize actions. While all actions must be within a stage, decision shapes can determine the flow both within and between stages.


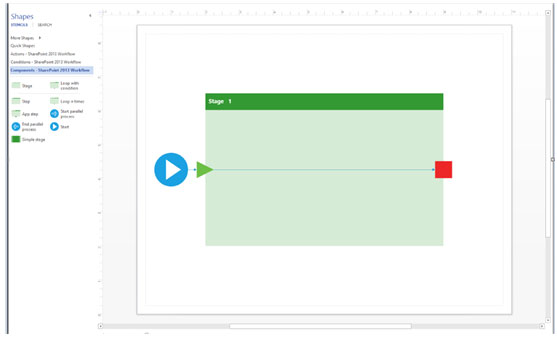
With Visio open, if you look at the stencil pane at the left, you'll see all new shapes.  These are not just a visual update; SharePoint 2013 workflow actions and conditions have been updated to support .Net 4.0 workflows.  We've also added a new stencil, Components, where you'll see the shapes to support stages and steps as well as loops, another new highly requested feature.

Along with adding new workflow elements, we've eliminated the export step to save workflow for use in SharePoint Designer.  SharePoint 2013 workflows you have saved as new Visio Drawing (VSDX) files can be opened in either Visio or SharePoint Designer with no export step needed.

Let's take a look at how this all works together.

An example of creating a workflow

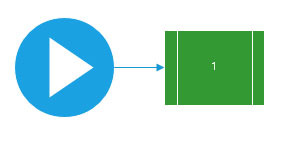
Imagine that your team wants to create a workflow to track credit approvals of your customers.  As a first step you decide to rough out the high-level process.  To make this easier, after creating your new workflow you first go to the Process tab and click Stage View on the SharePoint Workflow section.  It creates a Default Stage View page that uses Simple Stage shapes to represent each stage. Since you hadn't added any additional stages, all you have is a single, unnamed stage, which looks like this:


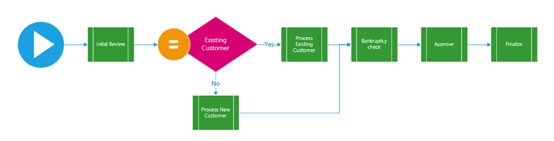
Now you can add additional Simple Stage shapes and Conditions to flesh out your workflow until you have the overall flow of the workflow designed.  Then, by selecting the shapes and typing, you can edit the names to reflect the actual stage and condition names and add "yes" and "no" labels to the decision branches.  When you're done, it looks more like:


If it's a complex workflow, at this point you would probably want to review the workflow with your team, so you could use the new collaboration features to get feedback on the workflow and make sure you have correctly defined the major stages.

Once you're sure that the diagram is as you want it, you can go back to the Process tab and click Create Workflow and Visio builds you a diagram where empty stage containers replace your stage view shapes, which gives you a framework for your workflow.


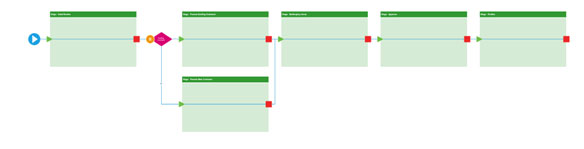
Now you'll need to flesh out each stage by adding the proper workflow actions and conditions.

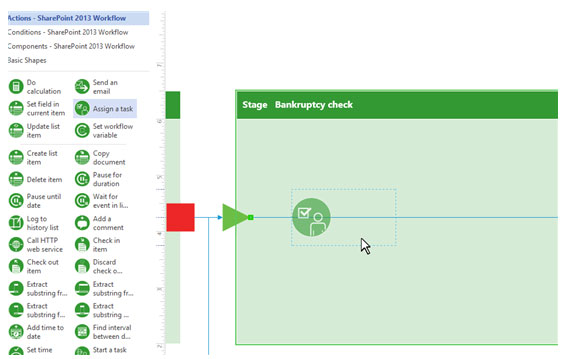
If you look at the Actions stencil you'll see a lot of different possible actions, such as "Send an email" and "Create list item".  Each of these actions represent an action that can be part of the steps that are executed on the SharePoint server when the workflow is running.  You can combine these actions to determine what happens in each stage of your workflow. Let's focus in on one of the simpler stages, the Bankruptcy Check to see how building a stage works.

Since our stage view had the names of each of the stages, the generated workflow already has a stage called "Bankruptcy check".  We can zoom in on that stage to make our work simpler.  The first step we want is to assign a task to the person who will do the research into possible bankruptcies.  This is as simple as dragging the "Assign a task" shape onto the stage and dropping it on the line you see running across the stage.  Connector splitting will break the connector where you dropped the shape and reattach connectors on each side.


You can then rename the action so that it's more meaningful.  The bankruptcy check has several other steps in it, including a condition that changes the execution of the workflow depending on whether there has been a bankruptcy or not.  You simply add the additional shapes to reflect the flow of the decision, add the names, add labels to indicate which decision connector is "yes" and which is "no", and you're done.  You'll end up with a stage that looks like this:


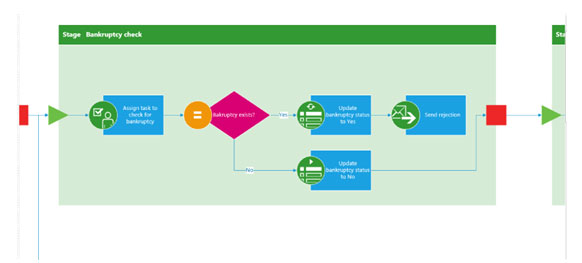
Hint:  If you design your workflow so that "yes" decisions go to the right and "no" decisions go down, your diagram will be more consistent and Visio's routing engine will do a better job whenever automatic layout occurs.

Once you've filled out the entire workflow, used collaboration to get comments and make any adjustments, and you have a workflow that you all agree properly models the steps you want your SharePoint workflow to execute, then you can make the workflow executable.  For that you use SharePoint Designer.

In Visio 2010, workflows had to be exported using an intermediate file format that was used only to interoperate with SharePoint Designer.  Once the file was opened in SharePoint Designer, adding parameters was a matter of editing text in a programming interface. We've simplified both steps in this version.

Since there's no export step, you simply need to open your saved workflow in SharePoint Designer; Visio's new Visio Drawing (VSDX) file format lets you seamlessly move between Visio and SharePoint Designer.  

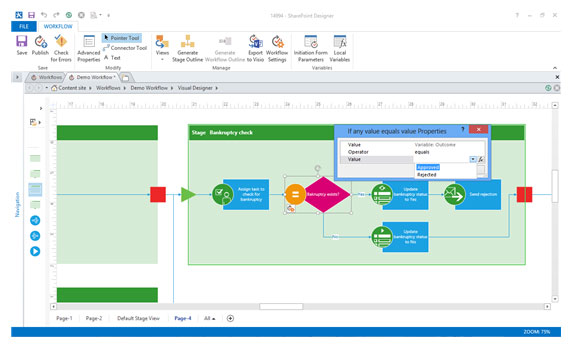
SharePoint Designer also now hosts Visio as an ActiveX control, which lets you use the familiar Visio interface to visually edit workflows in SharePoint Designer and add parameters using action tag dialogs if both the new SharePoint Designer and the new Visio are installed on your computer.

First you use the action tag dropdown to select the action you want:


Then you set the properties using the Action Designer.


After you do this for each of the actions, you can then set the conditions for each of the decision shapes:


When you're done, the finished workflow can be published so that it will run on the SharePoint Server.

For more information on how you add parameters and publish a workflow in SharePoint Designer, take a look at Sam Chung's blog post, Introducing the new Visual Designer.

In summary

The new Visio lets you design a SharePoint 2013 workflow from an outline to a finished diagram using simple drag and drop and basic editing.  You can share and collaborate on the diagram to work with your team to perfect and finalize the workflow.  Since SharePoint Designer now supports visual design using the Visio diagramming engine, editing and parameterizing can now be done with a visual interface.

If you haven't already, download the Visio Preview and try out the new SharePoint 2013 template


Currently rated 2.9 by 110 people

  • Currently 2.918182/5 Stars.
  • 1
  • 2
  • 3
  • 4
  • 5


Microsoft SQL 2012 Hosting with ASPHostCentral.com

clock June 6, 2012 15:57 by author Administrator

ASPHostCentral.com offers the latest SQL Server 2012 database to all our new and existing customers.

You can always start with our
Standard Plan (from @$4.49/month) to have your SQL 2012 database hosted on our environment. Should your requirement changes in the future, you can always request for an upgrade without causing any downtime. Remember, everything is just one-click away from your mouse! So, why wait longer? Please register your interest here.


Microsoft SQL Server 2012?

This latest release of the SQL Server presents new features and improvements that increase the power and efficiency of architects, developers, and administrators who design, develop, and maintain data storage systems

Features of SQL Server 2012 Hosting

SQL Server 2012 delivers several primary benefits:          

Always-On Availability Groups (AAG) - As for some Exchange administrators this feature is very similar to Database Availability Groups (DAG) in Exchange 2010. Configuring SQL 2012 AlwaysOn Availability Groups involves creating and constructing one or more availability groups. An availability group is a global container that defines a set user DBs (availability databases) to fail-over in case of disaster, and a set of database replicas to host multiple copies of each DB. An each group requires at least two replicas exist: the primary replica and one secondary replica.

Always-On SQL Failover Cluster
Failover clusters across subnets - A SQL Server multisubnet failover cluster is a design where all failover cluster node is connected to a different networks or different set of networks. These networks can be in the same physical location or in phsicallydispersed . Clustering across global sites is sometimes referred to as Stretch-clusters. As there is no need for shared storage that all the nodes can access, data should be replicated among the data storage on the multiple networks. With data replication, there is further than one copy of the data available. Therefore, a multi-subnet failover cluster offers a disaster recovery solution in addition to HA

Flexible policy for cluster health detection - In a SQL Server failover-cluster instance, only one node can own the cluster which is sometimes known as a single copy cluster. The client demands are served through this primary node for that failover cluster instance. In the case of a hardware failure, the group ownership is moved to another node in the failover cluster node. In this case the process is called failovering over a cluster

Indirect checkpoints - This new feature offers a database-specific substitute to automatic checkpoints, which are shaped by a server property. An indirect checkpoint implements a new checkpointing formula for the DB Engine. This offers a more accurate assurance of database recovery time in DR event or a failover than is provided by automatic-checkpoints. To guarantee that database recovery does not top allowable downtime for a given db, you can stipulate the maximum acceptable downtime for that database

Our Special SQL 2012 Hosting Complete Features


New Customer - You can start from as low as $4.49/month to start hosting your SQL 2012 on our environment. If you do not have a domain name, please do not worry as we will give you one FREE domain name (worth $14.99/year) if you register for any of our hosting plans for 12 months service(*). We will do our best to help you create your first web presence on the internet and we will continuously support the growth of your business.

Existing Customer - For all existing customers, a migration to a server that supports SQL 2012 is required and hence, a migration and setup fee apply. Starting from 15th April 2012, we have offered the latest SQL Server 2012 version and for clients who registered before this date is required to pay this setup fee. Thank you.

Currently rated 2.5 by 139 people

  • Currently 2.492805/5 Stars.
  • 1
  • 2
  • 3
  • 4
  • 5


MVC 4.0 BETA Hosting FREE Account is now available at ASPHostCentral.com

clock March 14, 2012 16:33 by author Administrator

ASPHostCentral.com, the leader in ASP.NET and Windows Hosting Provider, proudly announces that we have supported the latest ASP.NET MVC 4.0 BETA Hosting.   

To support Microsoft ASP.NET MVC 4.0 BETA Framework, we gladly inform you that we provide this beta account FREE of charge for a limited time (* terms and conditions apply). 


New Features in ASP.NET MVC 4


This section describes features that have been introduced in the ASP.NET MVC 4: 
- Enhancements to Default Project Templates
- Better Support for Mobile Project Template
- Enhancement in Display Modes
- Mobile Project Template support for VB.NET
- Dependency Injection Improvements    

Terms and Conditions in Using this ASP.NET MVC 4.0 BETA Account
 

The followings are the features you will get under this FREE ASP.NET MVC 4.0 BETA Account: 
- ASP.NET MVC 4.0 Beta Framework
- 1 Website/Domain
- 100 MB disk space
- 100 MB bandwidth
- 50 MB SQL 2008 space
- 24/7 FTP access
- Windows Server 2008 Platform

If you want to participate in this BETA program, there are several rules you need to understand: 

- As this is a beta version, not all the features are available. They may be some issues on this beta framework, which will be fixed upon the full release of ASP.NET MVC 4.0 Framework

- ASPHostCentral.com does not guarantee the uptime of the sandbox solution. Additionally, we do not keep/store any backup of your files/accounts

- ASPHostCentral.com does not guarantee rapid response to any inquiries raised by a user

- This free account is only meant for testing. Users should not use it to store a production, personal, e-commerce or any blog-related site

- This free account is used to host any ASP.NET MVC 4.0 beta website only. Any questions that are not related to ASP.NET MVC 4.0 BETA will not be responded. A user shall not host any non-ASP.NET MVC 4.0 site on this free account either

- ASPHostCentral.com reserves full rights to terminate this beta program at any time. We will provide a notification on our Help Desk System prior to the termination of this program

- ASPHostCentral.com reserves full rights to terminate a user account, in which we suspect that there is an abuse to our system

- Once this beta program is terminated, your account will be completely wiped/remove from our system.

- This offer expires on 31st May 2012

If you wish to participate in this FREE ASP.NET MVC 4.0 BETA Program, you must register via https://secure.asphostcentral.com/BetaOrder.aspx


Currently rated 1.8 by 114 people

  • Currently 1.842105/5 Stars.
  • 1
  • 2
  • 3
  • 4
  • 5


ASP.NET 4.5 Beta FREE Hosting with ASPHostCentral.com

clock March 13, 2012 17:40 by author Administrator

ASPHostCentral.com, the leader in ASP.NET and Windows Hosting Provider, proudly announces that we will support ASP.NET 4.5 Hosting.

To support Microsoft ASP.NET 4.5 Beta Framework, we gladly inform you that we provide this beta account FREE of charge for a limited time (* terms and conditions apply).


The followings are the features you will get under this FREE ASP.NET 4.5 BETA Account:                

- .NET 4.5 Beta Framework
- 1 Website/Domain
- 100 MB disk space
- 100 MB bandwidth
- 50 MB SQL 2008 space
- 24/7 FTP access
- Windows Server 2008 Platform

 If you want to participate in this Beta program, there are several rules you need to understand:              

- As this is a beta version, not all the features are available. They may be some issues on this beta framework, which will be fixed upon the full release of ASP.NET 4.5 Framework
- ASPHostCentral.com does not guarantee the uptime of the sandbox solution. Additionally, we do not keep/store any backup of your files/accounts
- ASPHostCentral.com does not guarantee rapid response to any inquiries raised by a user
- This free account is only meant for testing. Users should not use it to store a production, personal, e-commerce or any blog-related site
- This free account is used to host any ASP.NET 4.5 beta website only. Any questions that are not related to ASP.NET 4.5 beta will not be responded. A user shall not host any non-ASP.NET 4.5 site on this free account either
- ASPHostCentral.com reserves full rights to terminate this beta program at any time. We will provide a notification on our Help Desk System prior to the termination of this program
- ASPHostCentral.com reserves full rights to terminate a user account, in which we suspect that there is an abuse to our system
- Once this beta program is terminated, your account will be completely wiped/remove from our system.
- For details, please check
http://www.asphostcentral.com/ASPNET-45-Beta-Hosting.aspx
- This offer expires on 31st May 2012

If you want to participate on this FREE ASP.NET 4.5 Beta Program, you must register via https://secure.asphostcentral.com/BetaOrder.aspx

Currently rated 2.9 by 103 people

  • Currently 2.85437/5 Stars.
  • 1
  • 2
  • 3
  • 4
  • 5


SharePoint Server 2010 Hosting :: How To Configure Exchange 2010 to route mail to SharePoint

clock November 2, 2011 20:39 by author Administrator

We will now look at the setup required on our Exchange server to complete the task; this is the same in Exchange 2007 and Exchange 2010.

The first step is to create a new send connector so in Exchange Management Console navigate to Organization Configuration|Hub Transport and click the send connectors tab. In the actions pane on the right click “New send connector”


Enter a descriptive name and select internal from the dropdown list then click next on the next screen you will have to enter the FQDN’s of your SharePoint server.


Click next; on the next screen enter the IP address of your SharePoint server and make sure that Route mail through the following smart host radio button is selected.


Click next; the next page asks about your authentication settings leave this at the default “None” selection.


Click next; At Twynham we have all the Exchange roles on one Exchange box so the next screen asks for the address of the hub transport server which should be picked up automatically during the setup of the send connector but you can add one manually


Click next and then new and finish your send connector for SharePoint is now setup and we can continue to the next step.

Currently rated 2.2 by 173 people

  • Currently 2.242773/5 Stars.
  • 1
  • 2
  • 3
  • 4
  • 5


SharePoint Server 2010 Hosting :: How To Configure Exchange 2010 to route mail to SharePoint

clock November 2, 2011 20:39 by author Administrator

We will now look at the setup required on our Exchange server to complete the task; this is the same in Exchange 2007 and Exchange 2010.

The first step is to create a new send connector so in Exchange Management Console navigate to Organization Configuration|Hub Transport and click the send connectors tab. In the actions pane on the right click “New send connector”


Enter a descriptive name and select internal from the dropdown list then click next on the next screen you will have to enter the FQDN’s of your SharePoint server.


Click next; on the next screen enter the IP address of your SharePoint server and make sure that Route mail through the following smart host radio button is selected.


Click next; the next page asks about your authentication settings leave this at the default “None” selection.


Click next; At Twynham we have all the Exchange roles on one Exchange box so the next screen asks for the address of the hub transport server which should be picked up automatically during the setup of the send connector but you can add one manually


Click next and then new and finish your send connector for SharePoint is now setup and we can continue to the next step.

Currently rated 2.9 by 105 people

  • Currently 2.857142/5 Stars.
  • 1
  • 2
  • 3
  • 4
  • 5


SharePoint 2010 Hosting :: Steps-by-Steps to Setup Mail Enabled Document Libraries in SharePoint 2010

clock November 1, 2011 17:02 by author Administrator

We are working on a continuing SharePoint 2010 support project for a group of school one of the features they require is the ability for students to be able to have a drop box to submit their work to teachers, this is a perfect example of the use of mail enabled document libraries in SharePoint so I thought while I am writing this up I may as well share how to setup this function. This post will be divided into five parts:-

1)      Configuring SMTP on the SharePoint Servers
2)      Configuring Exchange 2010 to route mail to SharePoint
3)      Configuring Active Directory
4)      Configuring SharePoint 2010 Central Admin
5)      Document Library Configuration

Configuring the SMTP service on SharePoint 2010

The first step we need to do in the setup is to add and configure the SMTP service on one of our SharePoint web front end servers. I will be setting this up on a farm configuration with 2 web front end servers and 1 application server.

The SMTP service is vital for mail flowing into SharePoint so your first port of call is to log onto your chosen SharePoint server and open server manager and navigate to features here we can add the SMTP service


As you can see from the illustration below after the service is installed the server MAY require a restart in my case this was not needed but it may be needed on your server so please be aware that you may have to have some down time in your setup so plan accordingly.


As you can see from the illustration above the setup of the service is now complete and no restart was required. The next step is to configure the service through IIS manager on the server, for this you will need to use IIS manager 6 here at Twynham we install this role during the setup of our servers but you may not, if not installed open Server manager|Roles|Add Roles|IIS 6 Management Compatibility through this interface which you can see below we can manage SMTP


Right click on SMTP Virtual Server and choose properties once open click on the access tab and then click the Authentication button “Anonymous Access” should be ticked.


Next step click OK and then click the Connection button and ensure that “All except the list below” radio button is selected and click ok


The final button to click is the relay button and make sure that “Only the list below” radio button is selected and also make sure that you see a tick in “Allow all computers which successfully authenticate to relay regardless of the list above”


You can also fine tune the permissible message size by going into the messages tab this could be crucial for students sending in attachments via email so please make sure this is set to a reasonable limit.


You will find that all the settings are pre-set out of the box the only setting that you will really need to check is the Start-up type on the SMTP service by default this is set to manual so obviously change this to automatic


"A quick Note from the field is that I have found that if you restart your exchange server you will need to restart the SMTP service on your SharePoint servers, we route our internal mail from an ISA server to Exchange 2010 and this needs to be done after each restart of the Exchange box.”


Currently rated 3.0 by 64 people

  • Currently 3.015625/5 Stars.
  • 1
  • 2
  • 3
  • 4
  • 5


Sharepoint 2013 Hosting

ASPHostCentral is a premier web hosting company where you will find low cost and reliable web hosting. We have supported the latest ASP.NET 4.5 hosting and ASP.NET MVC 4 hosting. We have supported the latest SQL Server 2012 Hosting and Windows Server 2012 Hosting too!


Calendar

<<  April 2024  >>
MoTuWeThFrSaSu
25262728293031
1234567
891011121314
15161718192021
22232425262728
293012345

View posts in large calendar

Sign in