Visualizing processes is at the heart of Visio's DNA and in Visio 2010 we took a big step forward in that area by including support for SharePoint workflows. This lets users create a workflow in Visio, import it into SharePoint Designer, and make it an executable workflow on SharePoint. In the new Visio we've added SharePoint 2013 workflows and made SharePoint Designer an even more integral part of creating workflows visually.
What are SharePoint workflows?
If you're not familiar with SharePoint workflows, they are process flows that use pre-defined common activities (such as send email) that can be executed as an automated process on a SharePoint server. This workflow could represent any of a number of business processes, such as a credit approval process, document review feedback, document approval, etc. In Visio 2010 we added a template that would allow you to design a workflow visually, then export your workflow to SharePoint Designer, where you could add parameters to your workflow and publish it.
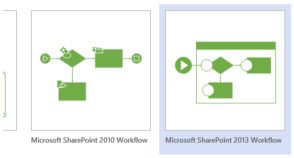
The new Visio still includes SharePoint 2010 workflows that you can use as you have in the past, but it adds the new Microsoft SharePoint 2013 Workflow template.
Some major changes
Once you create a new SharePoint 2013 workflow, instead of a blank canvas you'll see that every new workflow starts with an empty container called a "stage". Support for stages was a highly requested feature that allows you to simplify complex workflows. Each stage contains all of the actions that make up that logical section of the workflow. Simple workflows might be only a single stage, while complex workflows could have many stages. Within stages, "step" containers allow you to further organize actions. While all actions must be within a stage, decision shapes can determine the flow both within and between stages.
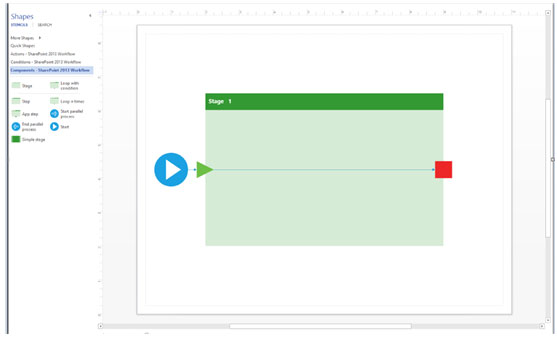
With Visio open, if you look at the stencil pane at the left, you'll see all new shapes. These are not just a visual update; SharePoint 2013 workflow actions and conditions have been updated to support .Net 4.0 workflows. We've also added a new stencil, Components, where you'll see the shapes to support stages and steps as well as loops, another new highly requested feature.
Along with adding new workflow elements, we've eliminated the export step to save workflow for use in SharePoint Designer. SharePoint 2013 workflows you have saved as new Visio Drawing (VSDX) files can be opened in either Visio or SharePoint Designer with no export step needed.
Let's take a look at how this all works together.
An example of creating a workflow
Imagine that your team wants to create a workflow to track credit approvals of your customers. As a first step you decide to rough out the high-level process. To make this easier, after creating your new workflow you first go to the Process tab and click Stage View on the SharePoint Workflow section. It creates a Default Stage View page that uses Simple Stage shapes to represent each stage. Since you hadn't added any additional stages, all you have is a single, unnamed stage, which looks like this:
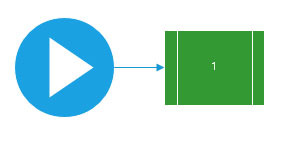
Now you can add additional Simple Stage shapes and Conditions to flesh out your workflow until you have the overall flow of the workflow designed. Then, by selecting the shapes and typing, you can edit the names to reflect the actual stage and condition names and add "yes" and "no" labels to the decision branches. When you're done, it looks more like:

If it's a complex workflow, at this point you would probably want to review the workflow with your team, so you could use the new collaboration features to get feedback on the workflow and make sure you have correctly defined the major stages.
Once you're sure that the diagram is as you want it, you can go back to the Process tab and click Create Workflow and Visio builds you a diagram where empty stage containers replace your stage view shapes, which gives you a framework for your workflow.

Now you'll need to flesh out each stage by adding the proper workflow actions and conditions.
If you look at the Actions stencil you'll see a lot of different possible actions, such as "Send an email" and "Create list item". Each of these actions represent an action that can be part of the steps that are executed on the SharePoint server when the workflow is running. You can combine these actions to determine what happens in each stage of your workflow. Let's focus in on one of the simpler stages, the Bankruptcy Check to see how building a stage works.
Since our stage view had the names of each of the stages, the generated workflow already has a stage called "Bankruptcy check". We can zoom in on that stage to make our work simpler. The first step we want is to assign a task to the person who will do the research into possible bankruptcies. This is as simple as dragging the "Assign a task" shape onto the stage and dropping it on the line you see running across the stage. Connector splitting will break the connector where you dropped the shape and reattach connectors on each side.
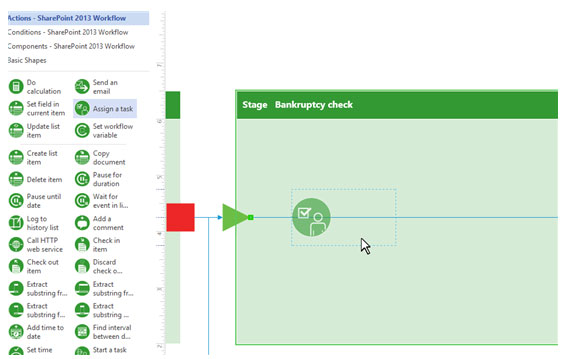
You can then rename the action so that it's more meaningful. The bankruptcy check has several other steps in it, including a condition that changes the execution of the workflow depending on whether there has been a bankruptcy or not. You simply add the additional shapes to reflect the flow of the decision, add the names, add labels to indicate which decision connector is "yes" and which is "no", and you're done. You'll end up with a stage that looks like this:
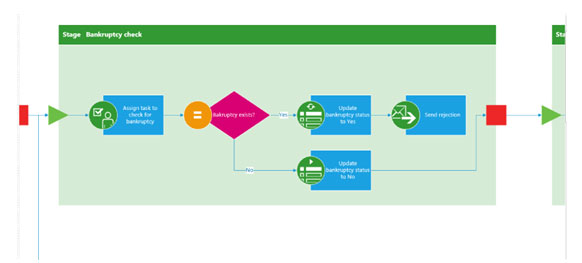
Hint: If you design your workflow so that "yes" decisions go to the right and "no" decisions go down, your diagram will be more consistent and Visio's routing engine will do a better job whenever automatic layout occurs.
Once you've filled out the entire workflow, used collaboration to get comments and make any adjustments, and you have a workflow that you all agree properly models the steps you want your SharePoint workflow to execute, then you can make the workflow executable. For that you use SharePoint Designer.
In Visio 2010, workflows had to be exported using an intermediate file format that was used only to interoperate with SharePoint Designer. Once the file was opened in SharePoint Designer, adding parameters was a matter of editing text in a programming interface. We've simplified both steps in this version.
Since there's no export step, you simply need to open your saved workflow in SharePoint Designer; Visio's new Visio Drawing (VSDX) file format lets you seamlessly move between Visio and SharePoint Designer.
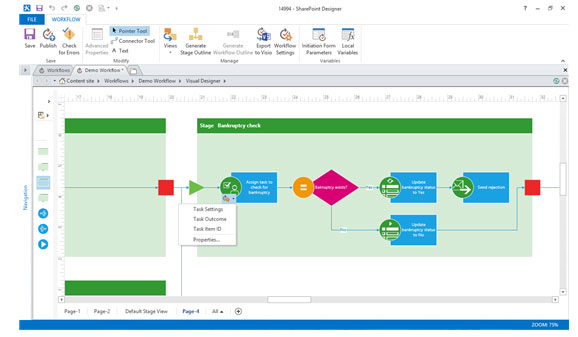
SharePoint Designer also now hosts Visio as an ActiveX control, which lets you use the familiar Visio interface to visually edit workflows in SharePoint Designer and add parameters using action tag dialogs if both the new SharePoint Designer and the new Visio are installed on your computer.
First you use the action tag dropdown to select the action you want:
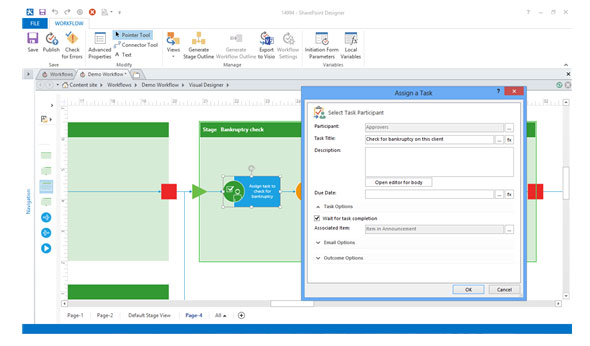
Then you set the properties using the Action Designer.
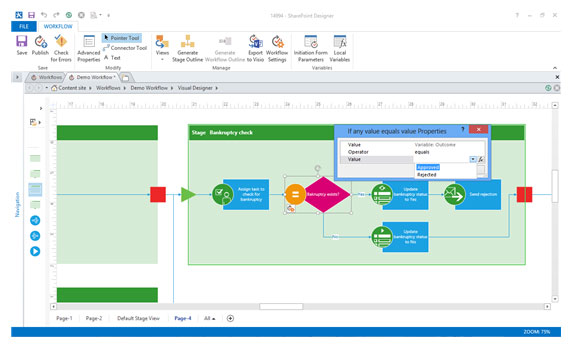
After you do this for each of the actions, you can then set the conditions for each of the decision shapes:
When you're done, the finished workflow can be published so that it will run on the SharePoint Server.
For more information on how you add parameters and publish a workflow in SharePoint Designer, take a look at Sam Chung's blog post, Introducing the new Visual Designer.
In summary
The new Visio lets you design a SharePoint 2013 workflow from an outline to a finished diagram using simple drag and drop and basic editing. You can share and collaborate on the diagram to work with your team to perfect and finalize the workflow. Since SharePoint Designer now supports visual design using the Visio diagramming engine, editing and parameterizing can now be done with a visual interface.
If you haven't already, download the Visio Preview and try out the new SharePoint 2013 template